Learn how to set up sales tax in QuickBooks Desktop.
Depending on the sales tax rules for a province or territory in which you operate your business, you need to collect either a combination of GST and PST, GST only, or HST only. QuickBooks helps you keep an accurate record of these taxes so you can easily monitor and remit them to the appropriate tax collecting agency.
As a business owner, it is important to know when and how to charge sales tax for the goods and services you supply your customers. To learn more, go to https://www.canada.ca/en/revenue-agency.html.
Benefits of setting up sales tax with the correct rates and requirements
- Makes it easier to generate reports required (that you will use later on) to fill out tax forms when paying sales tax liability.
- Paves way for accurate invoicing.
Before you set up your sales tax
- In compliance with the law, check the sales tax requirements for the location where you sell or ship your products and services to.
- Know the tax agency to pay the collected taxes.
- The CRA website is an excellent sales tax resource.
| Important: QuickBooks automatically sets all standard and provincial Sales Tax codes based on the company information you enter in the Express Start Interview during company file creation. For example, if you are in the province of Ontario and are registered for Sales Tax, QuickBooks sets up a tax code that calculates and post Ontario PST (P) and Ontario HST (H). |
Step 1: Set up sales tax preferences
- Go to the Edit menu, then select Preferences.
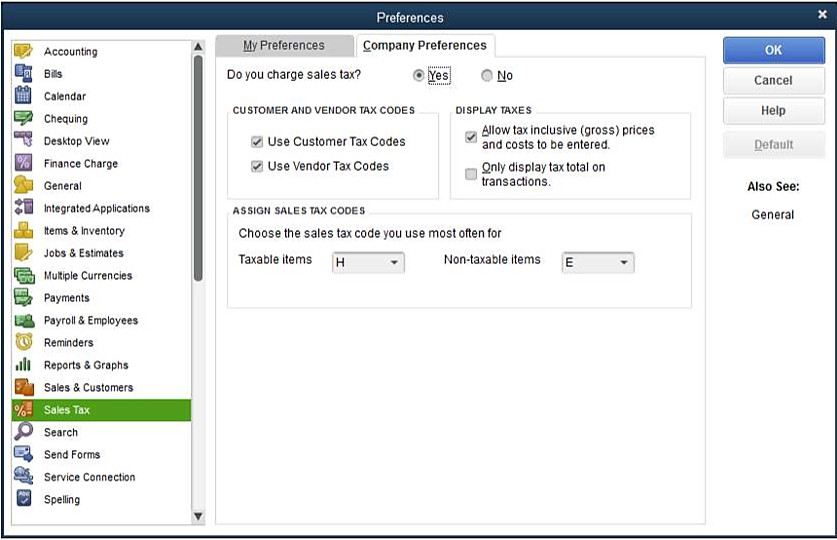
- In the Preferences window, select Sales Tax, then go to the Company Preferences tab.
- Select Yes to turn on sales tax.
- In the Customer and Supplier Tax Codes, mark both checkboxes to allow you to assign a tax code to each customer and supplier.
Note: The sales tax code assigned to a customer or supplier has priority over the sales tax codes for your products or services.
Customer and supplier tax codes
Whenever you create a form (invoice, estimate, sales order) for that customer or supplier, QuickBooks uses the sales tax code you've given this customer instead of the ones you've assigned to items. You might use this if you have a regular customer with a special status, such as exempt from sales tax.For details, including how to assign these codes based on currency, see Assign sales tax codes to customers or suppliers.
- Change how the sales tax is displayed on forms. On Display Taxes field, there are 2 options:
Allow tax-inclusive (gross) prices and costs to be entered
If you turn on this preference, QuickBooks adds the option to include sales tax in cost or price:
- on transaction formsIf you turn on this preference and go to the bottom-left corner of an invoice,you can select the Amounts include tax checkbox. Any invoices, sales receipts, or other purchase and sales forms you create then include the amount of sales tax in the Amount column.
- when you create or edit itemsIf you select the Amounts include tax checkbox in the bottom right of the New Item or Edit Item window, the price or cost of that item will include sales tax wherever the item is used.After you turn on this preference, make sure that when you create new items, you include the sales tax in the cost or price you enter.
Only display tax total on transactions
If you turn on this preference, QuickBooks will display the total sales tax ONLY and it will not break sales tax down into federal and provincial amounts. Check with your province or territory to understand their display requirements.
- Set sales tax defaults for items. In the Assign Sales Tax Codes area, select the tax code you use most often for both Taxable and Non-taxable items.
Assign sales tax codes you use most often
In the Assign Sales Tax Codes section, set the sales tax codes that are automatically assigned when you create new products or service items. This saves you time as you don't have to manually add the sales tax code each time you create an item. You might change these default codes, for example, if your business primarily handles goods with a special status, such as zero-rated goods.
Step 2: Create a tax agency
After setting up sales tax preferences, create a tax agency for your location where the sales taxes will be paid to. You can do this by adding a sales tax agency as a supplier in QuickBooks Desktop.
Add a tax agency in QuickBooks
A sales tax agency is a supplier to which you pay the sales tax that you collect. When you add sales tax codes, QuickBooks sets up the sales tax agency or agencies as Suppliers, that are associated with that tax code.
Note: Each sales tax item and code is associated with a sales tax agency. This ensures that the sales tax you collect gets paid to the correct tax agency.
The following steps will show you how to add a Tax Agency if required.
- Go to Supplier menu, then select Supplier Centre.
- Select New Supplier to open New Supplier window.
- In the Supplier Name field, enter the name of the tax agency (as you want it to appear on your supplier list), address, and contact information.
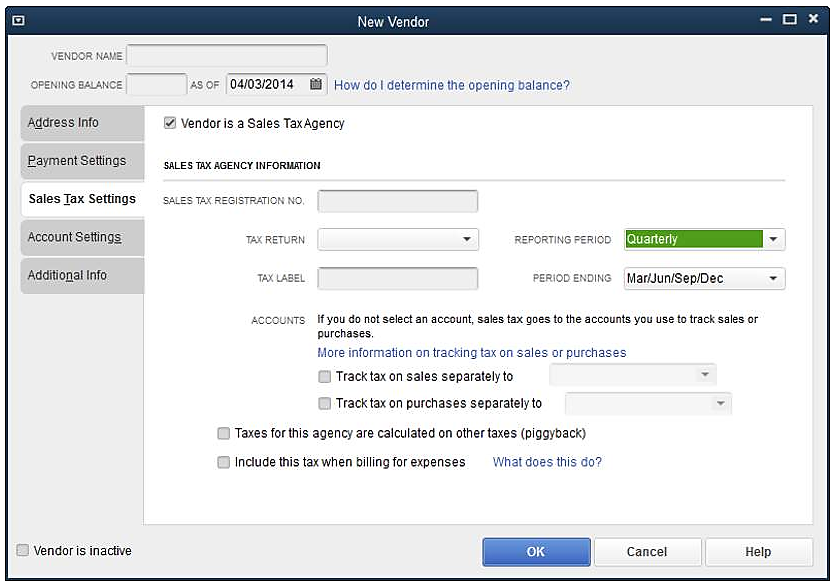
- If you owe the tax agency outstanding sales tax, enter the amount in the Opening balance field, then enter the date in the As of field.
Note: QuickBooks tracks your sales tax payments and balances based on your opening balance and subsequent customer sales tax collections. When you collect sales tax from customers, the amount you owe increases. QuickBooks updates your opening balance to reflect the amount of sales tax you must deposit with the tax agency. - On the Sales Tax Settings tab, select the checkbox for Supplier is a Sales Tax Agency.
- Enter the Business Number Number, then select Tax Return from the Tax Return drop-down.
- In the Reporting Period field, choose the appropriate reporting period (for the tax agency) from the drop-down.
- Choose the Period Ending you use for the filing based on the reporting period.
- Enter a Tax label.
- Select the account used to track sales separately to: (Can be different account)
- Select the account used to track purchases separately to: (Can be different account)
- Check if the agency calculates taxes on other taxes (piggyback).
- Check if you include this tax when billing for expenses.
Step 3: Set up Sales Tax Item or Group
QuickBooks uses sales tax items to calculate the sales tax on transactions and associate the tax with the correct sales tax agency (e.g. Receiver General). Then, the calculated sales tax tracks to the liability account for that agency (e.g. GST/HST Payable).
Add sales tax item and rate
QuickBooks sets the sales tax items that are used most often in the province where your business is located. However, you may sometimes need to add additional sales tax items.
- Go to List menu, then select Item List.
- From the Item drop-down, choose New, then open the New Item window.
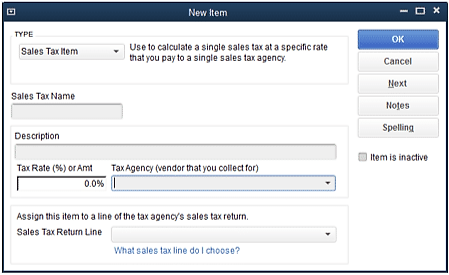
- From the Type drop-down list, choose Sales Tax Item.
- Enter a sales tax name. This name appears as one of the choices in the Tax field on your sales forms.
Note: The name may be seen by your customers on invoices or other forms. It's helpful for the name to indicate the sales tax return line. - (Optional) Enter a description. The description is for your own use, so use a description that reminds you of whether the item is for sales or purchases.
- Enter the sales tax rate or dollar amount.
- If the tax is a rate, enter a number and a % sign (e.g. 8.5%).
- If the tax is a fixed amount, such as fifty dollars, enter the number (e.g. 50) and press the Tab key on your keyboard.
- If you receive a warning, select OK to confirm that this tax is a fixed amount.
- From the Tax Agency drop-down list, choose the sales tax agency that collects this sales tax.
- Choose the line of the Sales Tax Return on which to report this sales tax item or choose Tax On Purchases or Tax On Sales. You see these options if:
- the sales tax return doesn't have a line for this item, (e.g. purchases on a PST return), or
- there is no sales tax return selected for this sales tax agency.
Important: The Tax Return Line options are based on the information in the sales tax agency record.
- Select OK.
- For new sales tax items which are rates (%), create a sales tax code to represent the sales tax item on transaction forms.
Step 4: Assign sales tax codes
QuickBooks sets up a list of common sales tax codes for you based on the province where your company is located. All provinces have the tax codes E (for Tax Exempt), and Z (for Zero-Rated). Most provinces also have the tax code G (for GST), except for some maritime provinces where the federal and provincial sales taxes are harmonized. In those provinces, the sales tax codes include H (for HST).
In provinces that charge PST, the sales tax codes include P (for PST alone) and S (for Standard, meaning GST and PST combined).
In Québec, the sales tax codes include Q (for QST alone) and S (for Standard, meaning GST and QST combined).
For Item
Some of the items you sell will be zero-rated or exempt from GST/HST. As the business sets up each product and service they sell, they must indicate whether the item is taxable or non-taxable.When you assign sales tax codes to an item:
- The code appears on the sales form (invoice, sales receipt, etc.) next to the item amount.
- QuickBooks knows (by default) which are taxable and non-taxable for each sale transaction.
To Manually add a Sales Tax code
- On the Lists menu, choose Sales Tax Code List.
- From the Sales Tax Code drop-down, choose New.
- On the New Sales tax Code window, enter the Sales Tax Code (maximum of 3 characters that you’ll recognize on a form such as an invoice), then add the corresponding description as a reminder of what the code stands for.

- Choose whether the code is Taxable, Non-taxable/Exempt.
- Codes represent sales tax items or sales tax group items. The sales tax item contains details about the tax, such as the rate or amount, and links to a single line of a sales tax return.
- If you want to track the sales tax you pay on business-related purchases, select the Sales Tax Item for Purchases drop-down. Choose the appropriate sales tax item (one that links to a return line for tax you paid on your purchases).If it doesn't exist, create the sales tax item or sales tax group item that this sales tax represents.
- Select the Sales Tax Item for Sales drop-down and choose or create the sales tax item (one that links to a return line for tax you collected on your sales).
- Select OK.
To edit a Sales Tax code
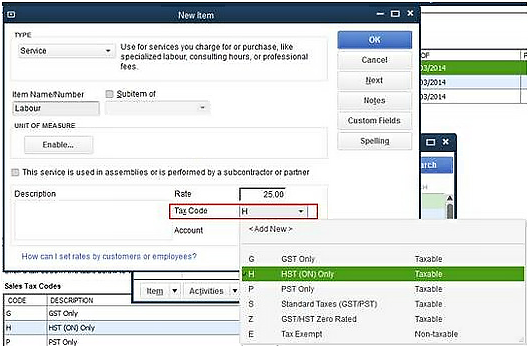
- Choose Lists, then select Item List.
- Double-click the item in the list that needs editing.
- Select the Tax Code drop-down list, then choose the appropriate taxable status for the item.
For Customer
In QuickBooks, most of the customers will be taxable. However, you can set up tax codes for individual customers. This tax code overrides the tax code entered for the items on the invoice. There are different options in QuickBooks to set up Sales Tax Codes for Customers.
Option 1 (On the Customer menu)
- On the Customer menu, select Customer Centre.
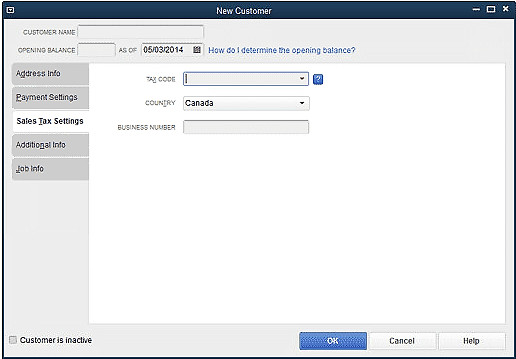
- Select New Customer from the New Customer & Job drop-down.
- Enter the customer name, then select Sales Tax Settings.
- Select the appropriate tax code from the drop-down, then choose OK.
Option 2 (On Sales Tax menu)
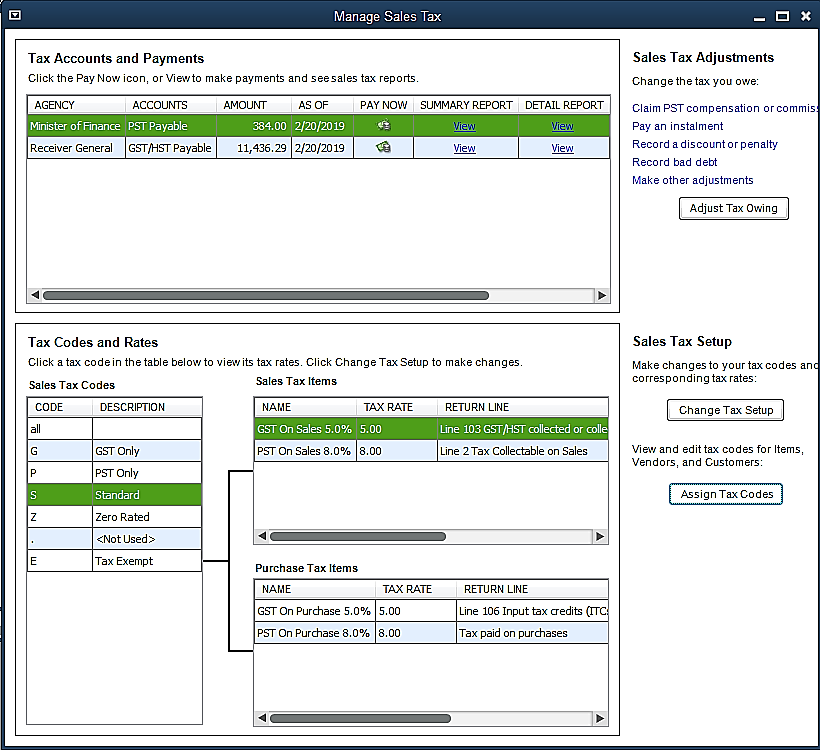
- On the Sales Tax menu, select Manage Sales Tax.
- On the Manage Sales Tax window, select Assign Tax Codes.

- From the Change tax codes for drop-down, choose Customers.
Set up sales tax for another province
If you need to charge sales tax for an additional province, follow the steps below to add the common sales tax codes, sales tax items, sales tax agencies, and sales tax accounts for that province.
To set up provincial sales tax for other provinces
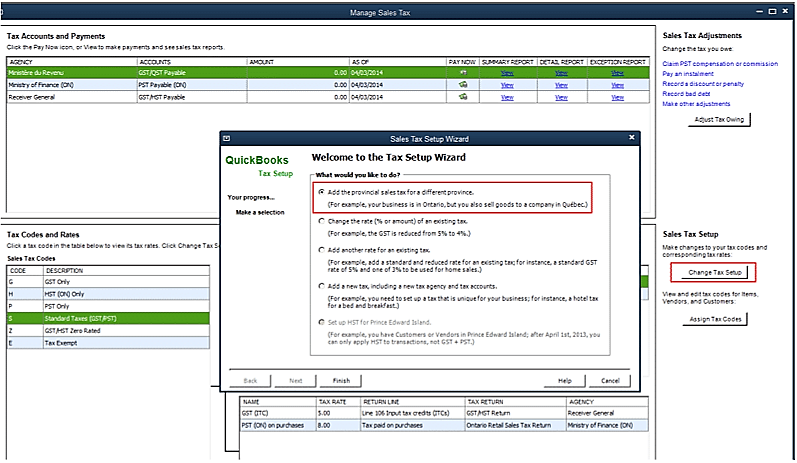
- Go to the Sales Tax menu, then select Manage Sales Tax.
- On the Manage Sales Tax window, select Change Tax Setup.
- On the Sales Tax Setup Wizard window, select Add the provincial sales tax for a different province, then choose Finish.
- Check off the province you want to create taxes for, then choose OK. The tax code and associated Tax Agency will be created.