In QuickBooks Desktop 2019, importing lists and transactions are more convenient and accurate with the improved Import IIF Tool. It eliminates the possibility of importing bad data by scanning your file for errors.
If errors are found, the tool:
- Shows the number of items successfully imported or failed.
- Provides a new .IIF file of the failed transactions, along with the descriptions of errors found.
The tool also now works in multi-user mode for QuickBooks Desktop 2019.
How to import .IIF files
- Go to the File menu, select Utilities then Import then IIF Files.
- Select Import IIF.
- Locate the file, then select OK.
Note: We don't recommend the option Import it for me. I'll fix it later. Since this option bypasses data review, some of the info may not be correct or complete for your books. It also requires that you switch to a single user. - Once the import is successful, you'll see the numbers of lists and transactions imported. Press Done.
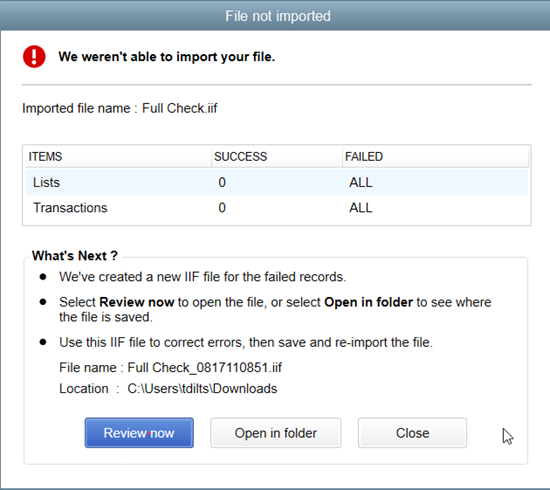
File not imported
If the import is unsuccessful, you'll see the number of list and transactions that both failed and was successfully imported. QuickBooks automatically creates a new .IIF file for failed records with error info. You then have 3 options to move forward:
- Review now opens the new .IIF created. Proceed to "How to review the errors in .IIF" section below.
- Open in folder opens the folder where the new .IIF file is located.
- Close closes the window and ignores the Lists and Transactions that weren't imported.
How to review the errors in .IIF
If you encounter the error "File not imported", QuickBooks gives you the option to review and resolve the errors found in the .IIF file.
- Select Review now.
- Look for ERROR to see what the problem(s) with the file is.
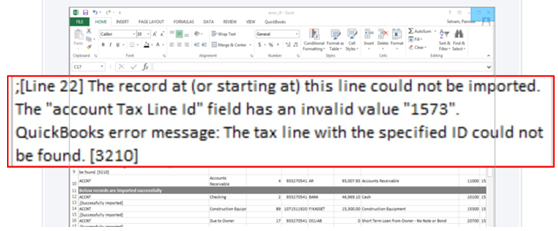
- Correct the errors and Save.
Important: If asked if you want to keep the file type, select Yes. - Close the File not imported window.
- Import the new, corrected .IIF file.
| Note: Intuit doesn't offer assisted technical support for creating or importing .IIF files. |