Learn how to reconcile your accounts so they match your bank and credit card statements.
Just like balancing your checkbook, you need to review your accounts in QuickBooks to make sure they match your real-life bank and credit card statements.
When you get your monthly bank statements, compare the list of transactions with what you entered into QuickBooks. If everything matches, you know your accounts are balanced and accurate.
Before you start a reconciliation, Make sure:
- You back up your company file.
- The beginning balance of your account is correct.
- All transactions for the statement period are in QuickBooks.
- You have a copy of your bank or credit card statement. A pencil for marking the selected items on your statement may also be handy.
Reconcile an account
Once you get your bank statement, you can start reconciling.
If you're reconciling multiple months, start with your oldest bank statement. Reconcile each month separately, one statement at a time.
- Go to Banking and select Reconcile.
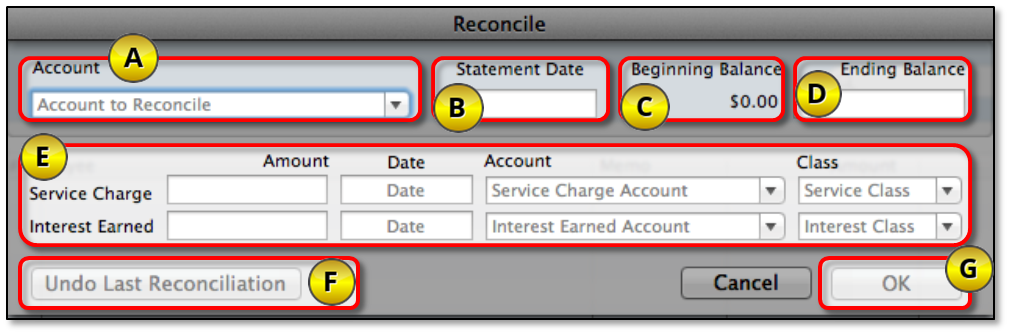
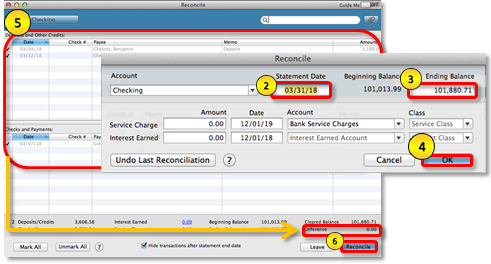
- Select Account then the bank or credit card account you want to reconcile.
- The Statement Date is automatically filled in. Usually, it's 30 or 31 days after the statement date of the previous reconciliation. Change it as needed to match your bank statement.
- QuickBooks also automatically enters the Beginning Balance. It uses the ending balance from your last reconciliation to get this number.
- Enter your Ending Balance based on your bank statement.
- Enter the Service Charge and Interest Earned based on your bank statement. Note: Don't enter charges you've already entered in QuickBooks.
- Review the fields. If the info is correct, select OK.
Match transactions
Let’s do a rundown of the options available in this window and what they are for.
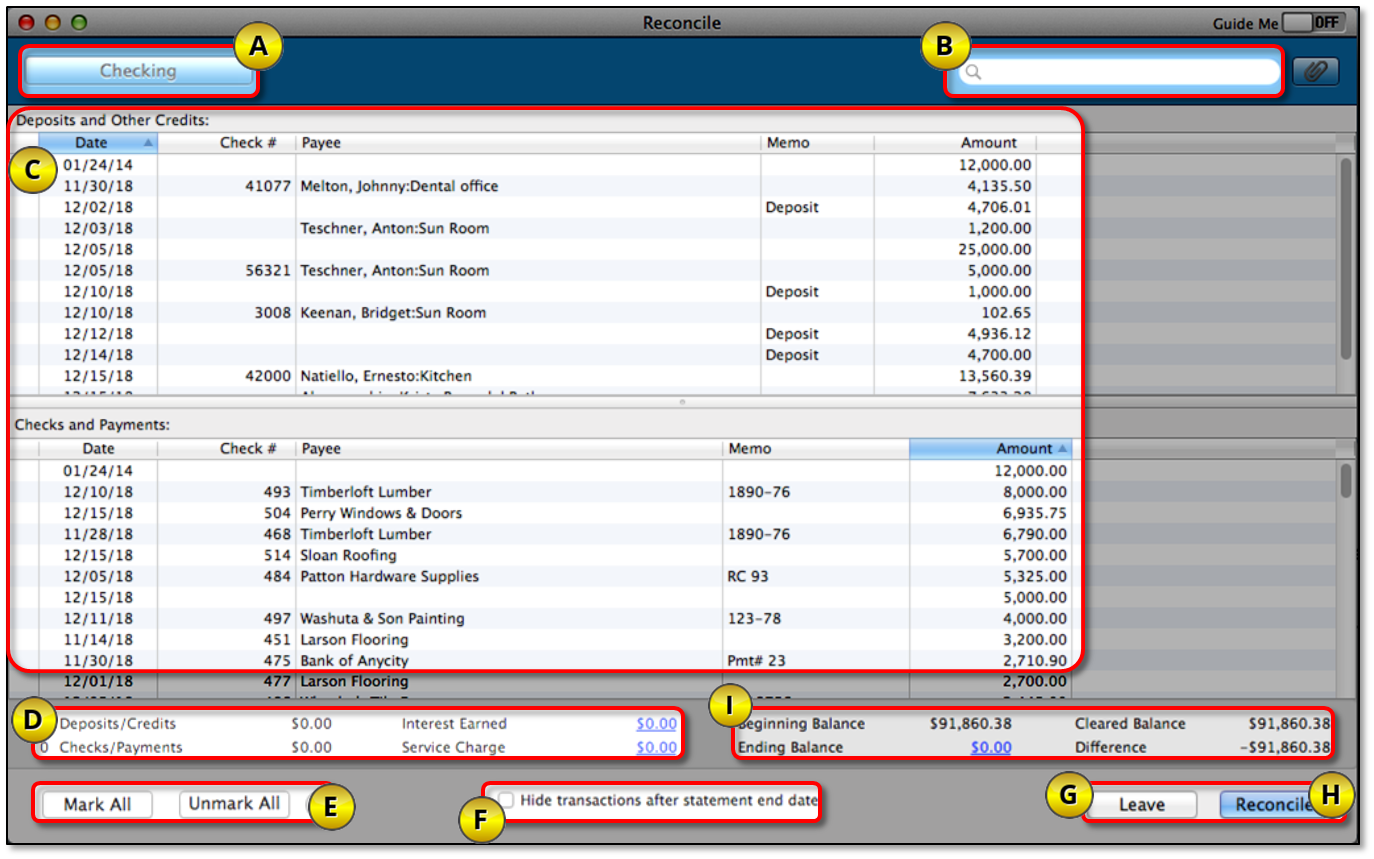
- Account: This indicates the account being reconciled. Select it to biew or change the info from the Begin Reconciliation window.
- Search field: You can search for uncleared transactions by Name, Amount, Account, Date, Check number, or Payee.
- Deposits and Other Credits, Checks and Payments: These are the uncleared transactions entered in QuickBooks. Check the transactions against what you have on your bank or credit card statement. As you select transactions, the Cleared Balance changes.
Note: For credit card accounts, the sections are Charges and Cash Advances (purchases), and Payments and Credits (payments to the credit card company). - Items you have marked cleared: This is the total number and the total amount of Deposits and Checks you’ve selected. If your bank provides the same summary on the statement, you can use it to help find discrepancies.
- Mark All/Unmark All: Select either of these buttons to select/deselect transactions. If you reconcile regularly and if all transactions for the statement period were entered correctly, selecting all transactions at once may save you time.
- Hide transactions after the statement’s end date: Select this box if you want to see only the transactions dated on or before the statement date.
- Leave: Select this if you need to exit the reconcile window. The items you selected will still be marked when you return to this window.
- Reconcile Now: Select this when all the transactions are matched.
What happens next?
The difference isn't zero
If the difference isn't zero, QuickBooks displays the Reconcile Adjustment window. The options available in this window are:
Return to Reconcile: Select this to go back to the previous window.
Enter Adjustment: Select this to complete the reconciliation process. QuickBooks will automatically enter a Journal Entry under a special expense account called Reconciliation Discrepancies. You can check and edit it as needed by going to your Chart of Accounts.
What if I don't want to enter an adjustment?
If you don’t want to enter an adjustment, you can use the following reports to find the cause of the difference. Once you find and correct the discrepancy. You will need to re-reconcile your account. You have two options to do this:
- Undo reconciliations from the one with the discrepancy forward and re-reconcile.
- Run a Special Reconciliation to only reconcile the affected transactions.
Previous Reconciliation Report
Step 1: Open the Previous Reconciliation Detail report
- Go to Reports, select Banking then Previous Reconciliation.
- On the Reconciliation Report Options window:
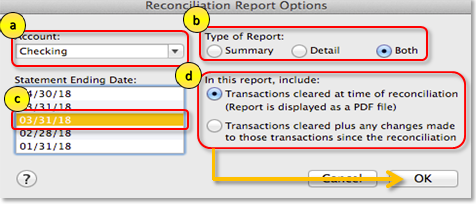
- Go to Account and select the appropriate bank or credit card account.
- Under Type of Report, select Detail.
- Select the statement ending date.
- Under In this report, include: section, select:
- Transactions cleared at time of reconciliation, then select Ok. The Report in the PDF format with the cleared balance when the account was reconciled will be displayed.
- Transactions cleared plus any changes made to those transactions since the reconciliation, then select Ok.
The Report with all the changes made in the account after the reconciliation will be displayed.
- Have both reports on your screen so you can check and compare balances and determine the last correct reconciled transaction.
Step 2: Identify the changed transactions and calculate the difference
If a transaction is modified, it gets un-reconciled. You need to identify these transactions so you can calculate the difference in your ending balance and correct it.
- Check the transactions line by line to see which were added, modified, or deleted.
- If the report shows that a cleared transaction was deleted, check if it was already reentered. If not, recreate the transaction.
- Calculate the difference in the ending balance on the two reports. Take note of the difference. You will use it when you perform a special reconciliation.
Example
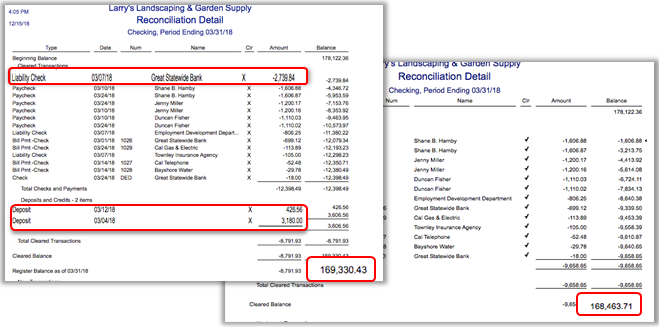
- The PDF report showing transactions cleared at the time of reconciliation has an ending balance of $169, 330.43.
- The report showing changes made after reconciliation has an ending balance of $168, 463.71. Note that three transactions (a liability check for $2,739.84 and deposits for $426.56 and $3,180.00) don't show on this report which means they got modified and un-reconciled after they were cleared.
- If you do the math, the total amount of the three transactions is equal to the amount of the ending balance difference in the two reports: $866.72.
Special Reconciliation
When you troubleshoot issues with bank or credit card accounts, you may need to delete and re-enter transactions and then reconcile them again. To save time and not go through undoing previous reconciliation for each month until you find the transactions causing the discrepancy, you can simply do a special reconciliation.
- Go to Banking and select Reconcile.
- In the Statement date field, enter the date of the incorrectly reconciled month.
- In the Ending balance field, enter the balance plus/minus the difference. If the difference is positive, add it to the beginning balance. If the difference is negative, subtract it from the beginning balance.
- Select OK.
- On the Reconcile screen, put a checkmark on the transactions that were un-reconciled. Make sure the difference is zero.
- Select the Reconcile button.
- Review the Previous Reconciliation Detail Reports again. Note that both reports will now show the same data.