You may be required to collect taxes for certain goods and services you offer. QuickBooks helps you keep an accurate record of these taxes so you can easily monitor and remit them to the appropriate tax collecting agency.
This article is part of a series on Sales Tax. It covers the usual sales tax workflow in QuickBooks Desktop.
A sales tax item is used to add and calculate tax charges when you make a taxable sale.
To create new sales tax items:
From the Typedrop-down, choose Sales Tax Item.
On the Sales Tax Name field, enter your preferred name for the tax item. It is advisable that you use the location of tax for the name. Further information can be entered in the Descriptionfield.
On the Tax Rate (%)field, enter the specific rate for the item.
On the Tax Agency field, type the name of the collecting agency (set up as a Vendor). If the agency is not in the list yet, select Add New to set it up.
Select OK.
To edit an existing sales tax item:
Go to the Lists menu, then select Item List.
Find the sales tax item you need to update.
Right-click on the item, then select Edit Item (pencil icon in QuickBooks for Mac).
Update information like the sales tax name, rate, and tax agency.
Set up sales tax group for multiple sales tax items that appear on the same sales transaction. When you set up a sales tax group, you can track and report sales taxes individually although they show as a single line item on your invoices and sales receipts.
From the Type drop-down, choose Sales Tax Group.
On the Group Name/Numberfield, type your preferred name for the tax item group. Further information can be entered in the Description field.
Enter each sales tax that you need to include in the group. If the tax item is not set up yet, select Add New, then follow the steps in creating a tax item.
Select OK.
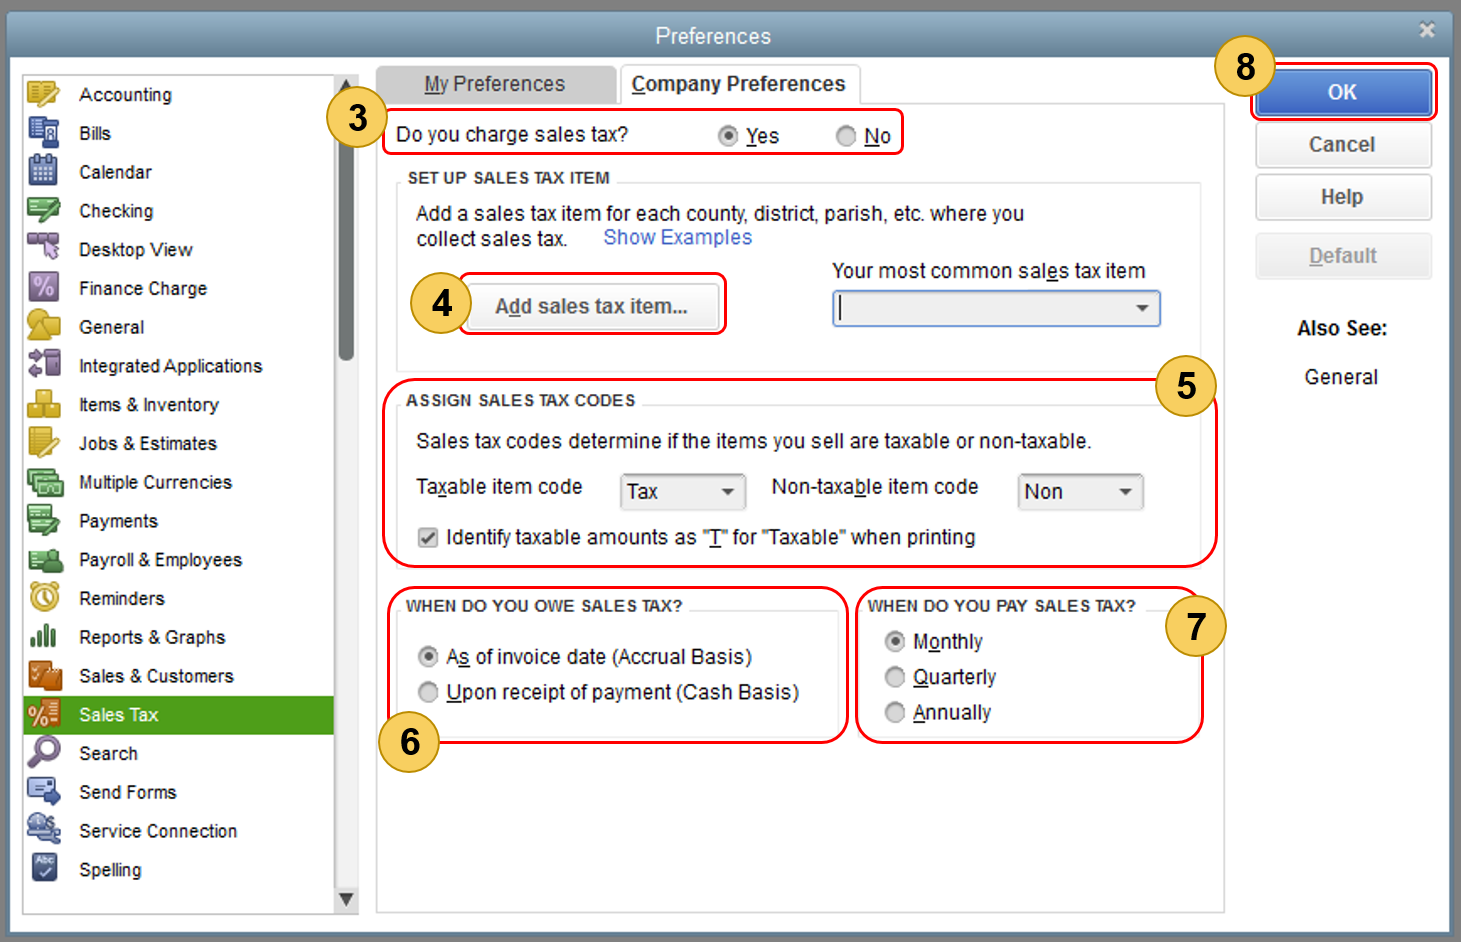
Assign sales tax codes. Sales tax codes help you track taxable and non-taxable sales and/or customers. Setting up and assigning the correct sales tax code allows you to run a report that divides the total taxable and non-taxable sales. When you turn on sales tax in QuickBooks, two tax codes are automatically created: TAX (taxable) and NON (non-taxable).TAX is used for items and customers that you need to collect tax for. NON is used for items and customers that are exempted from tax such as non-profit organizations, out-of state sales, or items that your customers will resell.
Go to the Customers menu, then select Customer Center.
Right-click the customer name you need to set up as non-exempt, then select Edit Customer:job. Note: If the customer is not set up yet, select New Customer & Job > New Customer.
On the Edit customer screen, go to the Sales Tax Settings tab.
From the Tax Codedrop-down, choose Non-Taxable Sales (or Service). On theResale No. field, enter the customer’s resale certification no.
If you want to create a tax code specific to your business needs, select the Tax Code drop-down then choose Add New. Other non-taxable codes that you can use are the following:
Sales tax code
When to use
OOS
OUT-OF-STATE SALES. Many states do not charge sales tax for out-of-state sales. You might assign this sales tax code to a customer who has bought your product from your company catalog, but lives in another state. Many QuickBooks company files already include this non-taxable sales tax code.
LBR
LABOR. In many states, labor services are not taxed, so you might assign LBR to a service item. Some QuickBooks company files already include this non-taxable sales tax code.
NPO
NON-PROFIT ORGANIZATIONS. Such organizations are not charged sales tax, even if the products and services you sell are taxable. NPO would be assigned to a customer.
GOV
GOV. Sales to government offices, which are not taxed.
WHL
WHOLESALERS. Customers who are simply reselling the goods they buy from you.
RSL
RESELLERS. Customers who are reselling the products they buy from you or who are using your products to create a product of their own, which they then sell.
Set the Sales tax basis (Accrual or Cash). Take into account your company’s accounting an preference.
Set up your preference for paying the sales tax (Monthly, Quarterly, Annually).